Sharing your screen in a classroom during a class session or formal presentation is a common task. Adding a remote audience can be challenging, especially when deciding which content or screen to share in Zoom. Here’s some background on why you might have had problems in the past and what to try the next time you need to make the classroom presentation system, your laptop slides, and Zoom work together to project the right content.
Why does it go wrong?
There tend to be two primary causes. When using PowerPoint, the software tries to help you by automatically going into Presenter View and showing different content on your laptop (Presenter View) and on the room screen (Slides). This can make it hard to decide what to click when you want to share content with your Zoom audience. Should you share the application? A screen or desktop?
Another frustration occurs in Google Slides, when you want to see your Presenter Notes, but you can't seem to separate them from the slides. The Presenter View shows up not only on your laptop, but on the audience screen, and Zoom, as well.
Simple solution: Present in Mirrored/Duplicate mode and share the entire screen in Zoom
(This is usually the default, but review this previous post if you need to switch your display settings back to mirrored.)
The simple solution is to simply present the same content on both your laptop screen and the connected classroom presentation system. In Zoom, choosing to share your entire screen (Desktop 1 or Screen 1) mimics what you are sending the classroom system and is recommended if you want to keep things simple. This does result in not having access to your Presenter View. If you absolutely need Presenter View and want to invest a bit more time in the set-up, check out our next blog posts on Using Presenter View in PPT and Google Slides.
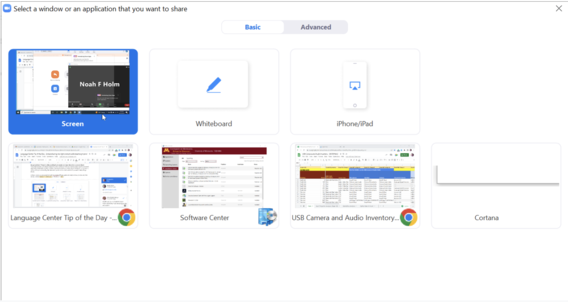
In Zoom, when you are presented with the window offering options for what to share, it is the very first choice, entitled “Screen 1” (Windows) or “Desktop 1” (Mac). This is also the window where you can click “Share sound” which is critical when playing video.
On a Mac:
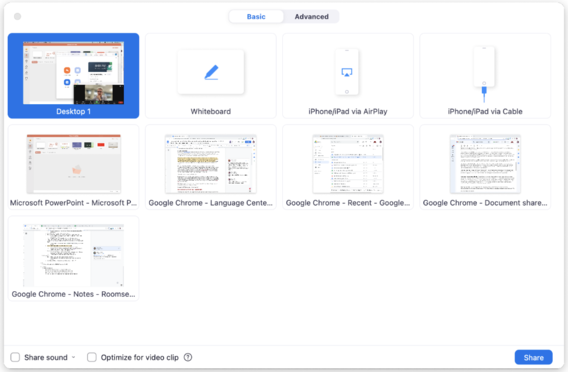
On a PC:
By matching what you share to Zoom with what you are projecting in the room, you can confidently switch between content - websites, PDFs, and slides. When you take apps like Google Slides full screen by clicking the green gem on a Mac or the maximizing rectangle in Windows, Zoom still has permission to ‘see’ and share what you are presenting in the room as it is sharing your entire screen.
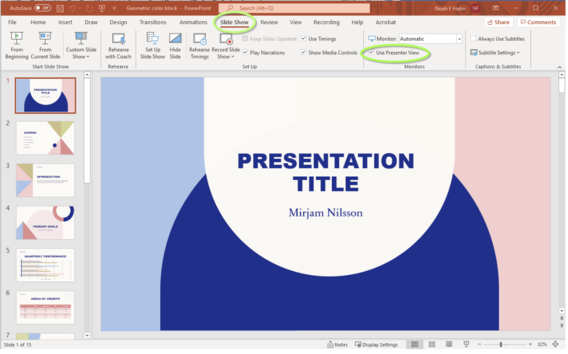
Special Note: if you are presenting in PowerPoint, however, you’ll need to toggle off Presenter View to keep it simple as shown below. (Instructions for using Presenter View will be discussed in the next blogpost).
In Windows, you can make this change in the Slide Show ribbon:
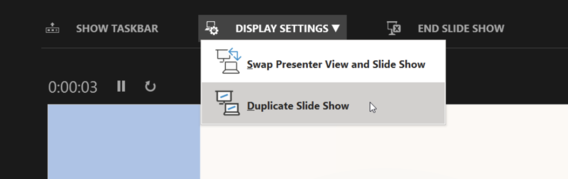
If you’re already running your slideshow, click on Display Settings to “Duplicate Slide Show”
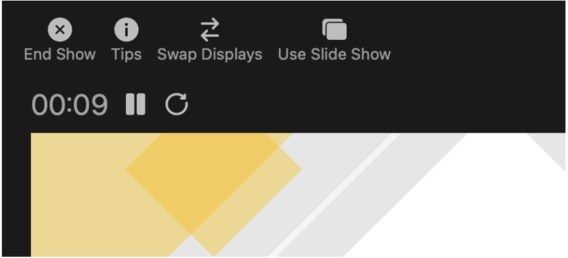
On a Mac, you’ll need to make the choice after you start presenting by clicking “Use Slide Show” on the Presenter View window to show the same content on both screens.
If you’re interested in having presenter mode running in either PowerPoint or Google slides, look for our next blogpost for recommendations.
Special thanks to Noah Holm, Academic Technologist for the Office of Classroom Management, for his expert advice in writing this tip.