Using audio and video clips in class is a simple and effective way to maintain student engagement and expose the students to various content in their target language. Incorporating such clips directly into a Google Slides presentation saves time needed to open other files or programs on the computer and allows the instructor to show a YouTube video without ads, even if one does not have a premium account.
In today’s Tip of the Day, we will provide step-by-step instructions on how to insert audio or video into Google Slides and will offer a few useful tips on designing the layout for the slides containing audio or video.
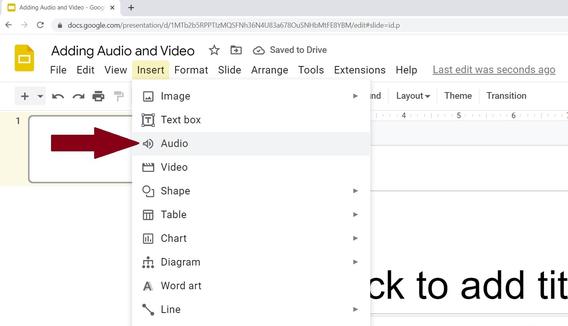
Inserting Audio on Google Slides
In order to insert an audio clip (e.g., in the .mp3 format), you need to first upload that clip into your Google Drive. Then in your slide deck, you can go to Insert > Audio and choose the clip you would like to insert.

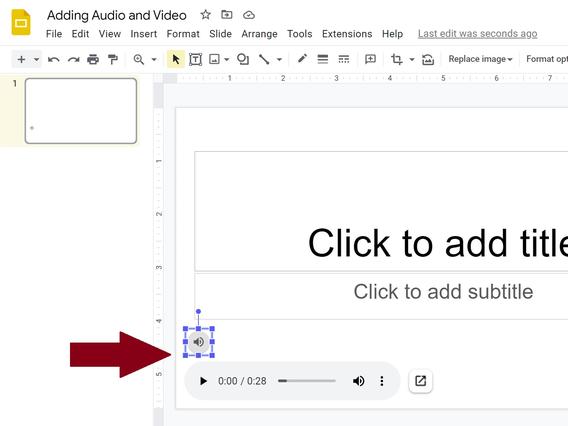
The file will appear in the bottom left corner of the slide. The round gray icon showing the location of the sound file on the slide will always be visible, and you can manually drag it to any part of the slide. However, the gray field with a Play button will only become visible when you are hovering over the sound file icon.
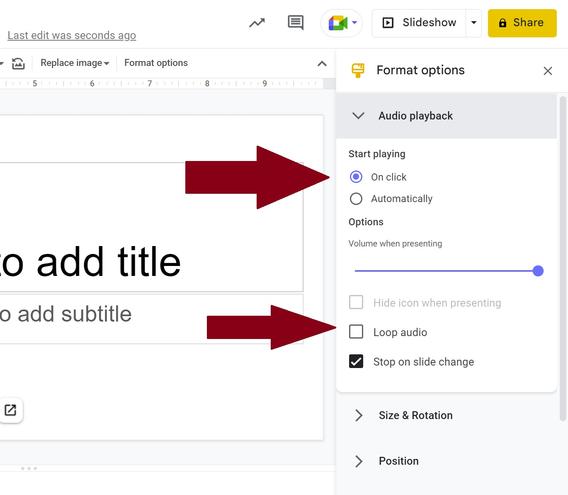
After you insert your audio file, make sure that the Playback Settings (the panel will automatically appear on the right side of the screen) are correct. The default settings are the following:
- Start playing: On click (this means that you would need to hover over the round icon until the gray panel appears below it and click on Play). If you would like your audio to start playing the moment the slide opens, you can check the Automatically box instead (in this case, you will also be able to choose the option to Hide icon when presenting).
- Volume when presenting: Full (you can move the slider to the left if you would like for the audio to be quieter).
- Stop on slide change: The audio will stop playing even if the time is not over in case you move on to the next slide. If you select the Loop Audio box, your audio will keep replaying until you manually stop it.
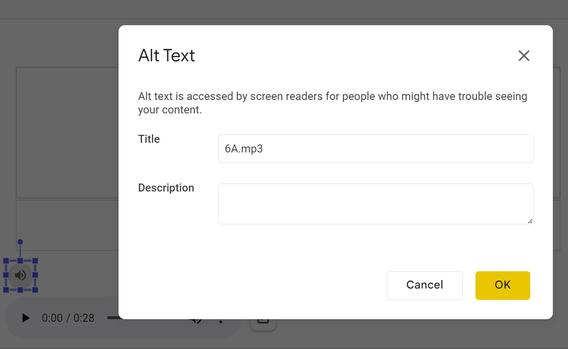
The final step is to provide Alt text for your audio by right clicking on the gray round icon and filling out the Description box. If the actual speech in the audio is not important (i.e., the audio file contains the sound environment of a public place or instrumental music), you can simply describe it. However, if the audio contains speech you expect your hearing students to understand, paste the full transcript into the box. If the transcript is very long, you can paste it into a Google Document and put the link to the document in the description.
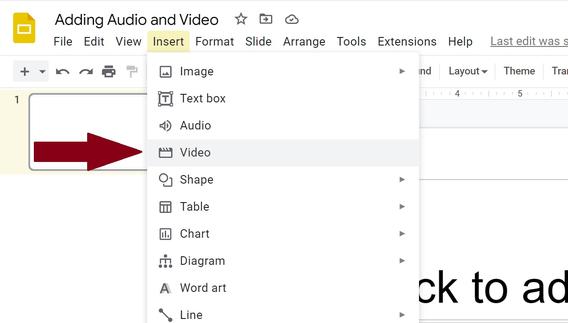
Inserting Video on Google Slides
In order to insert video into your slide deck, you need to go to Insert > Video.
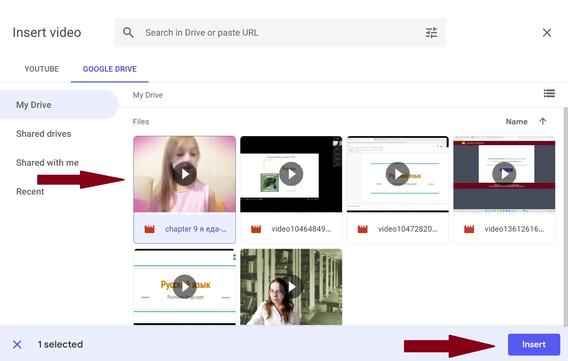
There are two options you will be able to choose from: YouTube or Google Drive. If you have a video uploaded to your Google Drive (e.g., in the .mp4 format), you can select it and click on Insert.
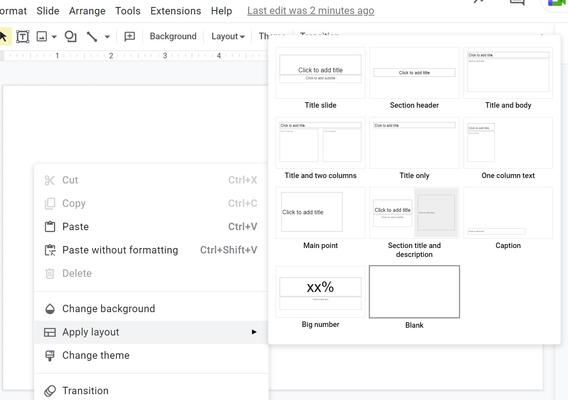
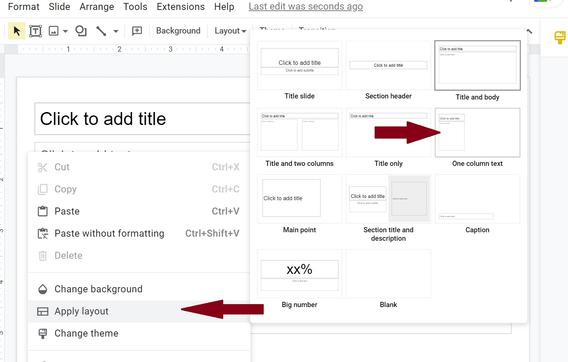
The way a video appears on the slide depends on the slide layout. In the standard “Title and body” or the blank layout, the video will appear to cover the entire slide and you will need to manually resize your video if you want to add a title or any other text. However, if the layout leaves some empty space on the slide (e.g., “Title only”, “Caption”, or “One column text”), the video will only occupy that space. You can change the layout by right clicking on the slide and selecting Apply layout.
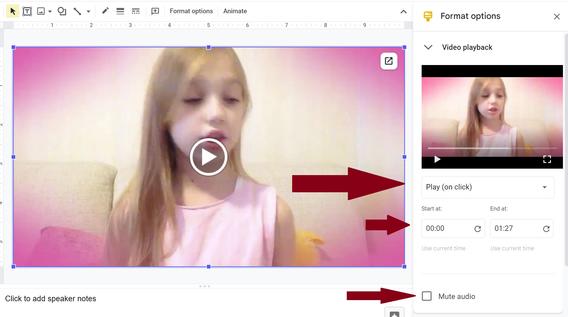
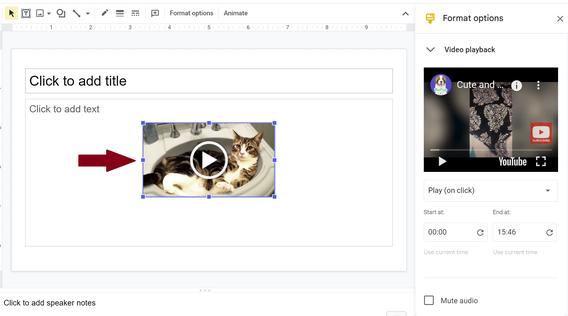
After the video is inserted, you also need to check the Video Playback menu on the right to make sure the settings are correct. The default settings are to play the entire video with sound from beginning to end on click. However, you can change those settings: Play (automatically) option would ensure that the video starts playing the moment you open the slide, and if you choose Play (manually), you would need to hover over the video itself, find the play button and press it. Check the Mute audio box if you would like your video to play without sound and specify start at and end at times if you would like to play only a fragment of the video.
If you would like to insert a video from YouTube, there are two ways to do that.
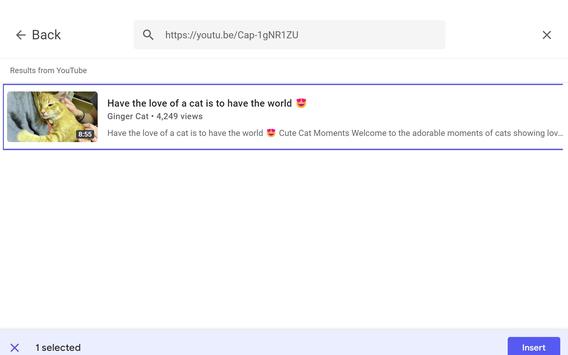
- Find the video you need on YouTube, copy the link (it is better to press Share under the video and copy from there than to copy the link directly from your browser), paste it into the search box, and press Enter. Then select the video and press Insert.
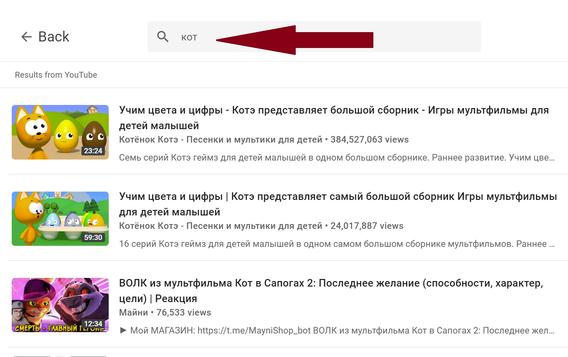
- Search for the video by typing the title of the video or a keyword. Importantly, Google Slides allow you to enter a search term in many languages, including those with non-Latin alphabet. Then select the video and press Insert.
The way a YouTube video appears on the slide does not depend on the slide layout, so you would need to manually resize it and move to the place where you want to see it. The default settings for the YouTube video are the same as for an uploaded video, and you can change them in the same way if you need to.
The final step, as with the audio file, is to add Alt Text. The rules are the same as with the audio file: provide a general description if you are using the video for creating a certain atmosphere but make sure to include the transcript and/or the detailed description of the action if you expect your students to understand what is going on and is being said in the video. If you inserted a YouTube video, it would usually have some form of description imported as well, but you need to check if that description satisfies the Alt Text requirements (i.e., provides enough information about it to a person who cannot see the video and/or hear the sound).
Ways to position the video
The position of the video on a slide depends on your purpose.
- If you are using a video for setting up atmosphere or for its overall message, the best choice would be to have it occupy the entire slide. While the title bar may not need to be visible for the duration of the video, it is important that it stays on the slide for accessibility purposes, especially if the slides are to be shared on Canvas or elsewhere. However, you can "hide" the title field behind the video either by matching the font text with the background color or by right-clicking on the title field > Order > Send backward or Send to back, and resizing the field if needed.
- However, if you want your audience to be thinking about 1-2 key questions while watching, it is better to type the questions in the left column to foreground them. Choose the One column text layout for the slide.

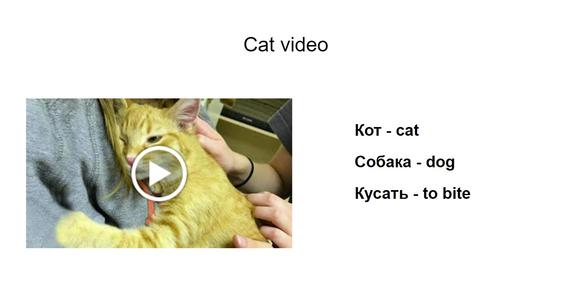
3. Sometimes, you may want to have some key words on the slide to be visible to the audience while they watch the video. The video should then be on the left to receive the viewer's greatest attention. We recommend choosing the Title and two columns layout, then manually removing the left column, and placing the video in its place. That way, your students will only glance at the words when they hear them.
By Irina Zaykovskaya, Lecturer, Department of German, Nordic, Slavic and Dutch